If you read my introduction, you know I'm a cheap person. A few months ago I worked on a project that had about 10 microservices. The company had a QA account and a production account. Each microservice had their own Application Load Balancer (ALB). The result was 20 ALB running 24/7. One ALB incur a minimum cost of approximately $190 yearly. Math time.
$190/year * (10 QA ALB + 10 PROD ALB) = $3800/yearFurthermore, the company had plans to release 10 more microservices in the coming year. It didn't take much to see this model wouldn't financially scale.
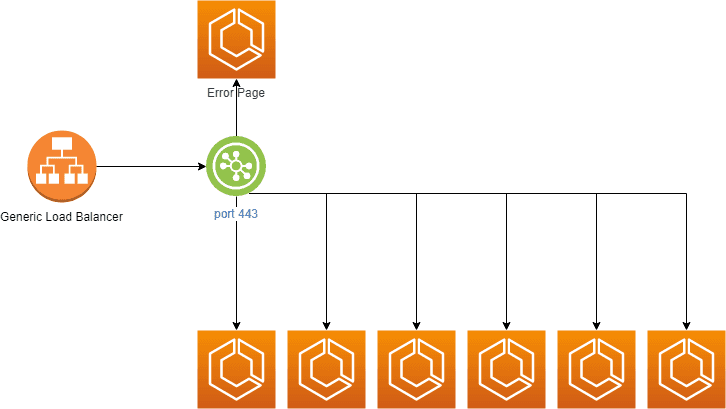
The first thing I noticed when looking on an optimization strategy was the fact that all load balancers had their usage below 5 to 10 percent. This meant that worst-case scenario, a single load balancer was able to support all microservices. The second (and most important) thing I learned about AWS ALB is that they're highly scalable. If your usage goes above 100% of your available LCU, Amazon simply scale your load balancer for you and charge you by the hour. This meant that we could easily replace all ALBs with a single one and still be confident that the services would be available. The company would pay only $190/year plus any extra cost to cover high demand hours. Off to implementation I went.
Caveat #1: An Application Load Balancer only allows 1 listener per port. If you have 10 Web Server microservices, it's only natural that all of them need to use port 80 or 443. Bottom line is we cannot establish one Listener per project on a single ALB. The conclusion is that we would have a single Listener for all HTTPS (443) and a single listener for all HTTP (80), which leads to Caveat #2.
Caveat #2: Every Listener MUST have a default action (Target Group). This is a tricky thing for a few reasons. The creation of the Listener becomes coupled with the creation of the default microservice. If there's ever a need to deprecate, retire, remove or replace the default microservice, it could mean an organization-wide downtime to replace the Listener. Besides that, if someone reaches out to specific-microservice.yourdomain.com and for some reason your rule is missing from the Load Balancer, they would land on the default microservice, which could be extremely confusing to an end-user. The solution I took at the time was to come up with an 11th microserivce with the purpose of being the default ALB action and providing an error page. If someone landed on that microservice, it's due to a misconfiguration. Besides, there would never be a reason to deprecate or remove that service as it's purpose in life is to just be the proxy owner of the Load Balancer resources.
Caveat #3: The timeout is part of the Load Balancer settings. In other words, every microservice will have to share the same timeout. Most of the time this isn't a problem, but I decided to list it anyway as it's something you should watch out.
Caveat #4: A Load Balancer is either internal or internet-facing. If you have internal-only services, you'll have to pay for at least two ALBs: an internal one and an internet-facing one.
The implementation
As mentioned, to save costs on all 10 ALB, first we need 1 more ALB to rule them all. Here's how we set it up:
  LoadBalancer:
    Type: AWS::ElasticLoadBalancingV2::LoadBalancer
    Properties:
      Scheme: internet-facing
      LoadBalancerAttributes:
        - Key: idle_timeout.timeout_seconds
          Value: 60
      SecurityGroups:
        - !Ref LoadBalancerSecurityGroup
      Subnets: !Split [',', !ImportValue PublicSubnets]

  LoadBalancerSecurityGroup:
    Type: AWS::EC2::SecurityGroup
    Properties:
      GroupDescription: Allow HTTP/HTTPS from anywhere
      VpcId: !ImportValue Vpc
      SecurityGroupIngress:
        - IpProtocol: tcp
          FromPort: '80'
          ToPort: '80'
          CidrIp: 0.0.0.0/0
        - IpProtocol: tcp
          FromPort: '443'
          ToPort: '443'
          CidrIp: 0.0.0.0/0
      SecurityGroupEgress:
        - IpProtocol: '-1'
          FromPort: '-1'
          ToPort: '-1'
          CidrIp: 0.0.0.0/0

  LoadBalancerDns:
    Type: AWS::Route53::RecordSet
    DependsOn:
      - LoadBalancer
    Properties:
      HostedZoneId: !ImportValue HostedZone
      Name: !Join ['', [alb., !ImportValue Zone]]
      Type: A
      AliasTarget:
        DNSName: !GetAtt [LoadBalancer, DNSName]
        HostedZoneId: !GetAtt [LoadBalancer, CanonicalHostedZoneID]

  # If you need HTTP Requests on port 80
  HttpListener:
    Type: AWS::ElasticLoadBalancingV2::Listener
    Properties:
      DefaultActions:
        - Type: forward
          TargetGroupArn: !Ref ErrorPageTargetGroup
      LoadBalancerArn: !Ref LoadBalancer
      Port: '80'
      Protocol: HTTP

  # HTTPS Requests on port 443
  HttpsListener:
    Type: AWS::ElasticLoadBalancingV2::Listener
    Properties:
      DefaultActions:
        - Type: forward
          TargetGroupArn: !Ref ErrorPageTargetGroup
      Certificates:
        - CertificateArn: !ImportValue WildcardCertificate
      LoadBalancerArn: !Ref LoadBalancer
      Port: '443'
      Protocol: HTTPS
      SslPolicy: ELBSecurityPolicy-TLS-1-1-2017-01

  ErrorPageTargetGroup:
    Type: AWS::ElasticLoadBalancingV2::TargetGroup
    Properties:
      TargetType: lambda
      Targets:
        - Id: !GetAtt [ErrorLambda, Arn]
Now that we have the load balancer up and running, we can start to setup all microservices to use it. That would look something like this:
  Certificate:
    Type: AWS::CertificateManager::Certificate
    Properties:
      DomainName: my-microservice.mydomain.com
      DomainValidationOptions:
        - DomainName: my-microservice.mydomain.com
          ValidationDomain: mydomain.com
      ValidationMethod: DNS

  Dns:
    Type: AWS::Route53::RecordSet
    Properties:
      HostedZoneId: !ImportValue HostedZone
      Name: my-microservice.mydomain.com
      Type: CNAME
      ResourceRecords:
        - !ImportValue LoadBalancerDns
      TTL: 3600

  HttpsListenerRule:
    Type: AWS::ElasticLoadBalancingV2::ListenerRule
    Properties:
      Actions:
      - Type: forward
        TargetGroupArn:
          Ref: TargetGroup
      Conditions:
      - Field: host-header
        Values:
        - my-microservice.mydomain.com
      ListenerArn: !ImportValue HttpsListener
      Priority: 1

  AttachCertificateToListener:
    Type: AWS::ElasticLoadBalancingV2::ListenerCertificate
    Properties:
      Certificates:
        - CertificateArn: !Ref Certificate
      ListenerArn: !ImportValue HttpsListener

  TargetGroup:
    Type: AWS::ElasticLoadBalancingV2::TargetGroup
    Properties:
      HealthCheckIntervalSeconds: 120
      HealthCheckProtocol: HTTP
      HealthCheckTimeoutSeconds: 30
      HealthyThresholdCount: 2
      HealthCheckPath: /healthy
      Matcher:
        HttpCode: '200'
      Port: 80
      Protocol: HTTP
      TargetGroupAttributes:
        - Key: deregistration_delay.timeout_seconds
          Value: '30'
      UnhealthyThresholdCount: 3
      TargetType: ip
      VpcId: !ImportValue Vpc

  #### The Service and Task Definition are out of the scope of this post.
If we configure the microservice DNS to point to the Load Balancer DNS, we can setup the Listener Rule to use the Request Header to use the microservice's target group. This file also shows how to attach the Microservice's Certificate to the Listener for HTTPS Listeners.
Bonus Caveat: Notice that to create the Listener Rule, we must specify a priority. This number cannot be reused when attaching more Rules to the same Listener. For the use-case I was working, the priority order did not matter at all as each microservice had their own domain and wouldn't compete with other microservices requests. But it is a bit of an annoyance that if you deploy a new microservice with the same priority, you get an error. I ended up preparing a table of microservices and their priority rules to serve as a dictionary when launching a brand new microservice. That way, developers would consult the table, choose the next priority that would be used and update the table. The table looks something like this:
| Microservice | Priority |
|---|---|
| Authentication | 1 |
| Legacy A (HTTP) | 2 |
| Legacy A (HTTPS) | 3 |
| Reporting | 4 & 5 |
| Service X | 6 & 7 |
| Service P | 8 |
Conclusion
I really enjoyed working on this project. It brought down the operational costs by a substantial amount, which on it's own is a successful optimization, but it also helped the team sell the idea that we can release more and more microservices without increasing the AWS bill exponentially.
As always, hit me up on Twitter with any questions.
Cheers.